
I love astronomy, so when I saw these “galaxy-style” or “nebula-style” decorated candles, I knew I had to try to make them for myself!
How do you make galaxy candles? Using either alcohol ink or acrylic paint, you can decorate a pillar candle or a glass jar for a container candle. The acrylic paint requires a candle painting medium to stick to pillar candle wax. You will need a Krylon sealant when using acrylic paint with a glass jar.
This is the final article in my 5-Part DIY Candle Series.
I have written 5 blog post articles, each covering a different DIY candle idea. If you are looking for some fun craft projects, please check out these other DIY candle ideas:
- Decorating pillar candles with tissue paper
- Tie-Dye or Marbled Candles
- Water Candles
- Jewelry Candles
- Galaxy Candles
Alright, here is what I figured out about how to make galaxy candles. I will discuss how to decorate both pillar candles and container candles.
Galaxy Pillar Candles with Alcohol Ink
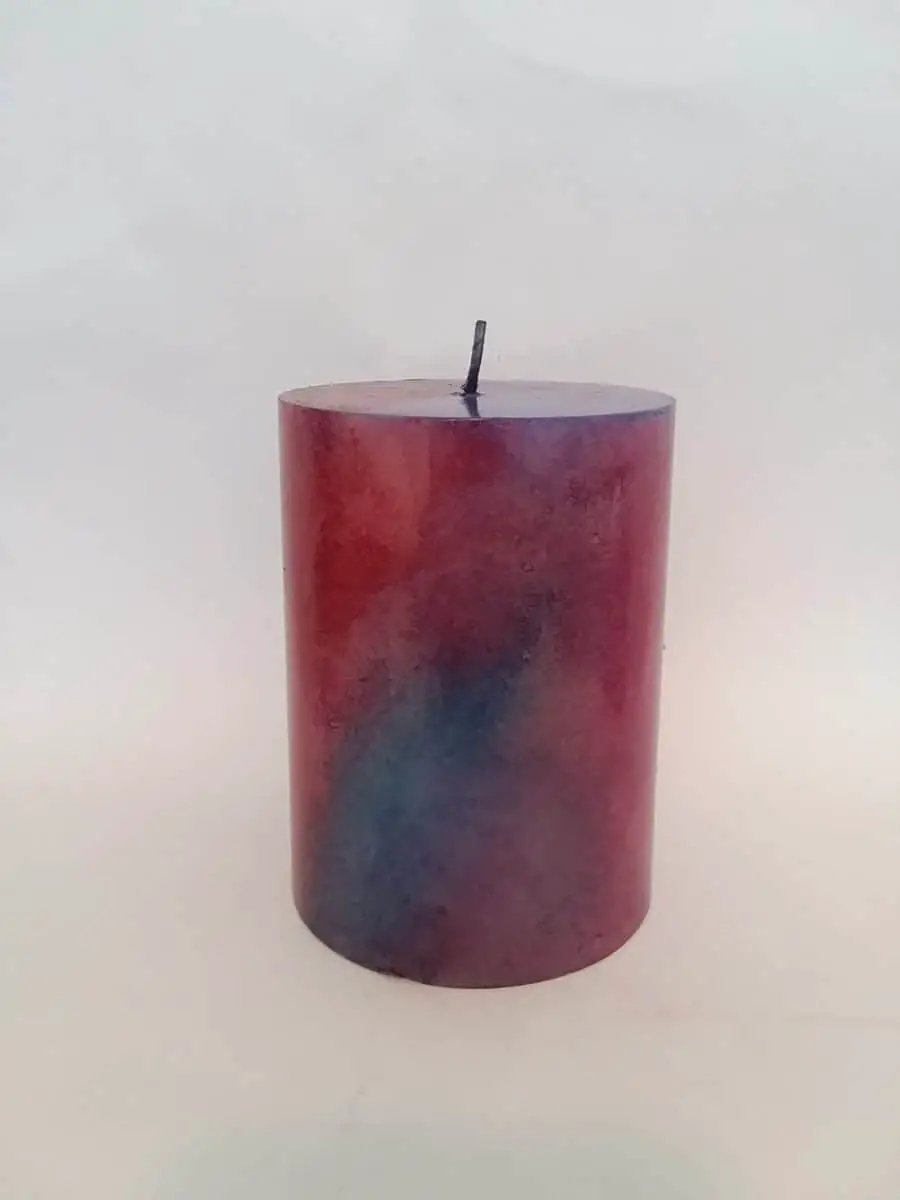
I discovered that you can “paint” pillar candles using alcohol inks.
The alcohol ink I found that works best is Ranger Tim Holtz. Here is the link for a 24-color bundle I purchased, which included brushes, blending solution, and a small spray bottle.
What is Alcohol Ink?
Alcohol ink is a highly-concentrated ink in an alcohol-based solution, such as isopropyl alcohol or ethanol. Alcohol ink is a permanent, fast-drying ink that is best used on non-porous, hard surfaces, such as glass and pillar candle wax.
DIY Alcohol Ink: Make Your Own Alcohol Ink
Alcohol inks can be expensive. If you wish, you can make your own alcohol inks from simply mixing rubbing alcohol and old markers.
Even though you may think a marker is dried-out, there can still be some ink left inside. A marker contains a long tube made of a cotton core that contains the ink. You can use the ink that’s left behind inside the marker.
Cut open an old, dried-out marker or highlighter and pull out the cotton tube. Cut it up into small pieces and add to a few ounces of rubbing alcohol in a small jar. Putting the lid back on the jar, shake to mix the rubbing alcohol and ink. Let it sit for several hours and once the ink has thoroughly mixed with the rubbing alcohol, it will be ready for use.
Keep in mind that this type of home-made alcohol ink will not be as concentrated or bright as manufactured alcohol inks. That’s why I recommend you buy your own alcohol ink. You will get better results.
Making the Alcohol Ink Pillar Candles, Galaxy-Style
SUPPLIES:
- White, light-colored, or neutral-colored pillar candle
- Alcohol ink (2-3 colors)
- Alcohol Blending Solution and/or 91% Isopropyl Alcohol (rubbing alcohol)
- Small spray bottle
- Wax paper
- Old towel, newspaper, paper bag, or cookie sheet to protect your work surface
- Sponge, strip of felt, or alcohol ink applicator. Here is the link to the one I bought on Amazon.
- Gloves
NOTES before we start:
- The alcohol ink will soak through the wax paper, so you want to protect your work surface with something else underneath and that is thicker. Therefore, placing down newspaper or a paper bag under the wax paper, will keep it from bleeding through onto your work surface. Also, laying a towel down first or working on a cooking tray would be a good idea to protect your work surface.
- Try to avoid using too many colors, because they could start to contrast or mix to become brown. That’s why it is suggested you only use 2-3 colors per candle.
- I found that the type of applicator tool is important. I tried a cotton ball and the alcohol ink did not appear to stick to the candle as well and bits of cotton started getting stuck to the candle. The second time I tried this project, I used a small square from some packaging foam and that seemed to work a lot better. I found the Tim Holtz applicator tool worked great, too!
- Another tip: I also found that it is important to coat the candle first in alcohol ink. It creates a “base” for the other layers of colors to stick to.
DIRECTIONS:
- Start with protecting your work surface by laying down an old towel, paper bag, or using an old cookie sheet or baking pan. The wax paper goes on top of this.
- Put on your gloves.
- Clean your candle by wiping it down with rubbing alcohol. Allow it to dry before adding the alcohol ink.
- Open up your alcohol ink. Please read the instructions. You may have to shake the bottle to mix the alcohol and ink.
- Pick a base color and drip some of the ink on the wax paper.
- Roll the candle in the ink so it is coated.
- Take your “dabber,” which could be a small sponge, piece of felt, or strip of packing foam, and add ink to it. Then, start dabbing the surface of the candle with the ink from the applicator. This will create a sort of “marbled” effect.
- Feel free to add different colors.
- Once your candle surface is coated with the ink, you could put a small amount of rubbing alcohol (or the Alcohol Blending Solution) into a small spray bottle to spray onto the candle. You will notice how this changes the effect of the ink on the candle.
- Continue to play around with adding and changing color and texture by dabbing, blotting, and spritzing.
- Once you are happy with the colors and design, you will want to let your candle sit for at least 24 hours.
One thing you may be wondering: Alcohol is flammable. Can an alcohol ink candle be burned? The alcohol will evaporate and just leaves behind the colored ink. So, you should be able to light it after allowing it to dry thoroughly, at least a full day.
Galaxy Container Candle with Alcohol Ink
As mentioned earlier, alcohol inks work great on glass, as well. So, you can also make a galaxy container candle using alcohol ink and a glass candle container.
This uses about the same method as above for the pillar candles, but with this technique you are coloring glass jars that you would use for candle containers with the alcohol ink.
You will need about the same supplies, except instead of a pillar candle, we are going to be using a glass jar for a container candle.
SUPPLIES:
- Glass jar for a container candle, such as a Mason jar
- Soap and water
- Optional: Scrubbing sponge and/or Magic Eraser
- Paper towel or cloth
- Alcohol ink (2-3 colors)
- Alcohol Blending Solution and/or 91% Isopropyl Alcohol (rubbing alcohol)
- Small spray bottle
- Old Towel, craft mat, wax paper, or paper bag to protect your work surface
- Sponge, strip of felt, or applicator tool
- Gloves
NOTES before we start:
- What I found with this technique is that you are not going to start by coating the glass with alcohol ink dripped on the wax paper, like with the pillar candles. It will not stick.
- What works best is to put a few drops of the alcohol ink on your “dabber” and start blotting away on the glass surface.
- You will have to experiment and find which application techniques works best for you. You can try different things, such as blowing on the ink, rubbing to ink the spread it around, dabbing, etc.
- Again, you want to start with a base color and then add your secondary color after you have your first layer.
- You are going to have to go over and around the glass jar several times to create a few layers of the ink. I would first start with the base color you want and go around 2-3 times to create a good foundation. You are going to need a few layers to start. This will make it easier for your secondary color to stick.
- This could get tedious for some people. It can be a long project, but also fun! And requires patience.
DIRECTIONS:
- Start with protecting your work surface by laying down an old towel, paper bag, or craft mat.
- Put on your gloves.
- Make sure the surface of your glass jar is clean and dry. Wash the glass jar with soap and water, removing any labels and sticky glue. If needed, you may have to use a scrubbing sponge to get off any residue. I have found that using a Magic Eraser works great for me. Dry with a paper towel or soft cloth.
- Clean your glass jar by wiping it down with rubbing alcohol and a cloth or paper towel. Allow it to dry before adding the alcohol ink.
- Open up your alcohol ink. Please read the instructions. You will probably have to shake the bottle to mix the alcohol and ink.
- Pick a base color and put a few drops directly onto your applicator tool. You can also drip the alcohol ink directly onto the glass for your first layer, but I find that this is a waste of a lot of alcohol ink. And since they are so expensive, I would avoid that and simply blot and dab the color on.
- Take your “dabber,” which could be a small sponge, piece of felt, or strip of packing foam, and add ink to it. Then, start dabbing the surface of the candle with the ink from the applicator.
- Continue to blot with your base color around all sides, so you cover the entire surface of the jar. You will have to go around several times to create a few layers of color for it to stick well and show up vibrantly.
- Once you have your base color you can start adding your secondary color. Do the same thing as before, placing the ink directly on the applicator and applying it to the glass using a blotting or dabbing technique.
- Feel free to add different colors.
- Once your candle surface is coated with ink, you could put a small amount of rubbing alcohol (or the Alcohol Blending Solution) into a small spray bottle to spray on to the candle. You will notice how this changes the effect of the ink on the candle. You can also try blowing on the alcohol ink for a different effect.
- Continue to play around with adding and changing color and texture by dabbing, blotting, and spritzing.
- Once you are happy with the colors and design, you will want to let your candle sit for at least 24 hours.
Once your glass jar is complete, you can add your wick and wax to create a container candle. Or you can simply put in a tealight or votive candle to create a “glowing effect” through the glass.
Again, there is no risk of fire since the alcohol evaporates and you are not directly burning the glass anyway.
Although, it will get hot while burning your candle, so make sure you have an appropriate glass jar for candle-making.
Here is my article on finding an appropriate container. Mason jars work perfectly for this!
Galaxy Container Candles with Acrylic Paint
I also learned you can make a “galaxy-style” candle using acrylic paint. With this method you are going to paint the glass jar for a container candle with acrylic paint in a galaxy-style or “nebula” motif.
SUPPLIES:
- Glass jar for container candle, such as a Mason canning jar
- Soap and water
- Optional: Scrubbing sponge and/or Magic Eraser
- Rubbing Alcohol (isopropyl alcohol)
- Paper towels
- Acrylic paint
- Palette, paper plate, or something else to put/mix your paint on
- Paint brushes and/or applicator, such as cotton ball, sponge, etc.
- Old towel, drape cloth, newspaper, or other material to protect your work surface
- Gloves
- Krylon spray coating
DIRECTIONS:
- Start by protecting your work surface and putting on your gloves.
- Make sure the surface of your glass jar is clean and dry. Wash the glass jar with soap and water, removing any labels and sticky glue. If needed, you may have to use a scrubbing sponge to get off any residue. I have found that using a Magic Eraser works great for me. Dry with a paper towel or soft cloth.
- Wipe down the jar with rubbing alcohol to prepare it for the acrylic paint. Rubbing alcohol can also help to remove any ink printed on the glass, such as expiration dates, etc.
- Pick out your colors and prepare your palette. You can mix colors, as you wish. Start painting the glass with your base color. Layer as you wish. Use an applicator tool to blot and dab color on to create the “galaxy” effect. You can also take a small-tipped paint brush and white paint to create small “stars.”
- Allow the paint to dry. Most acrylic paint will dry within a ½ hr., but depending on how many coats you used, how thick the paint is, and weather/environment (humidity/temperature, etc.), it could take up to 2-3 hours for your paint to dry.
- Once the glass jar is dry, you will want to coat it with a spray, such as Krylon, to protect it. Otherwise, the paint will eventually rub off over time.
A Krylon coating spray protects the surface of the glass and helps to keep the paint from fading or flaking off. Krylon has a variety of different products, but I found that the most commonly recommended product was their Kamar Varnish to seal acrylic paint on glass.
This is a link to one I got from Amazon. Please read and follow the directions and recommendations for safe use. You must use in a well-ventilated area or outside.
Once the jar is dry, you can use it for your candle container. You can add your wick and wax to finalize your candle project! Or you can simply add a tealight or votive candle to the inside of the jar for the “glowing” or “flickering” effect.
The thing I noticed about this method is that it creates bumps when you are applying the paint, so it is not a smooth surface. And the other major con is that the paint will flake off if you don’t seal it, that’s why I highly suggest the Krylon spray as your last step.
Galaxy Pillar Candles with Acrylic Paint
I found that it is possible to also use acrylic paint on pillar candles, but you need an extra ingredient to make it work.
You can use basically the same technique with the acrylic paint that you used on the glass containers and paint a pillar candle for the same “galaxy” effect.
In order for the paint to stick to the waxy candle surface and to be able to burn it once we are done, you will need a candle painting medium, which you can purchase on-line. This is the one I bought on Amazon.
SUPPLIES:
- Pillar candle
- Rubbing alcohol (isopropyl alcohol)
- Paper towel or cloth
- Candle painting medium
- Acrylic paint
- Palette, paper plate, or something else to put/mix your paint on
- Paint brushes and a blotting/dabbing applicator, such as a strip of felt, sponge, etc.
- Old towel, newspaper, drape cloth, or something else to protect your work surface
- Gloves
DIRECTIONS:
- Start with protecting your work surface and putting on your gloves.
- Clean the surface of the pillar candle with rubbing alcohol and a paper towel or cloth.
- Mix the candle-painting medium with your base color on your palette or a paper plate. Apply it to the candle with a large brush.
- Continue to add layers, making sure to mix the candle-painting medium with each color you want to add to the surface of the pillar candle.
- You can use a blotting/dabbing applicator tool, a strip of felt, or sponge to get the “galaxy” effect.
- You can use a small-tipped paintbrush to add smaller circles, stars, or other designs to your candle.
- Allow the paint to dry completely before lighting.
This is the final article in my 5-Part DIY Candle Series. I have written 5 blog post articles, each covering a different DIY candle idea. If you enjoyed this project, please check out these other DIY candle ideas:
- Decorating pillar candles with tissue paper
- Tie-Dye or Marbled Candles
- Water Candles
- Jewelry Candles
- Galaxy Candles
Recent Posts
An In-Depth Beginner Basics Manual on Candle Wicks: Wick Names and Numbers
Wick testing has to be the most frustrating part of candle-making for me. While I’ve been learning about the different types of wicks and which wick goes best with which wax, I noticed that...
A Complete Intro Lesson to Candle Wax Basics: How to Decipher the Code
After finishing my first candle-making kit and watching YouTube videos, I decided I wanted to try making more candles. I needed to order more wax, but quickly realized the options were...
