

I saw a video of this on YouTube and thought it was so cool! So, I have to give credit to Timber Ridge Gifts. You can find the videos here:
Marbled Container Candle Video Link
Tie-Dye Pillar Candle Video Link
I also watched videos from White Milk Soap and Candles for ideas.
Today I’m going to be talking about how to make marbled or tie-dye candles. These projects look complicated, but are actually pretty simple. And they take a lot of patience.
How do you make tie-dye or marbled candles? For marbled container candles, add the colored dye/wax against the glass edge in holes you have made with a pre-made candle or prior to pouring the candle, or drop in the dye after you pour the wax but before it sets. For tie-dye pillar candles, add dye blocks or marbling dye to water, and dip the candle.
This is Part 2 of a 5-Part DIY Candle Ideas Series. I have written 5 blog post articles, each covering a different DIY candle idea:
- Decorating pillar candles with tissue paper
- Tie-Dye or Marbled Candles
- Water Candles
- Jewelry and Hidden Gift Candles
- Galaxy Candles
I’m going to be discussing 4 different methods to use and make pillar and glass jar candles with a tie-dye or marbled effect, whether you have a plain candle you want to spruce up or you want to make and design your own candle.
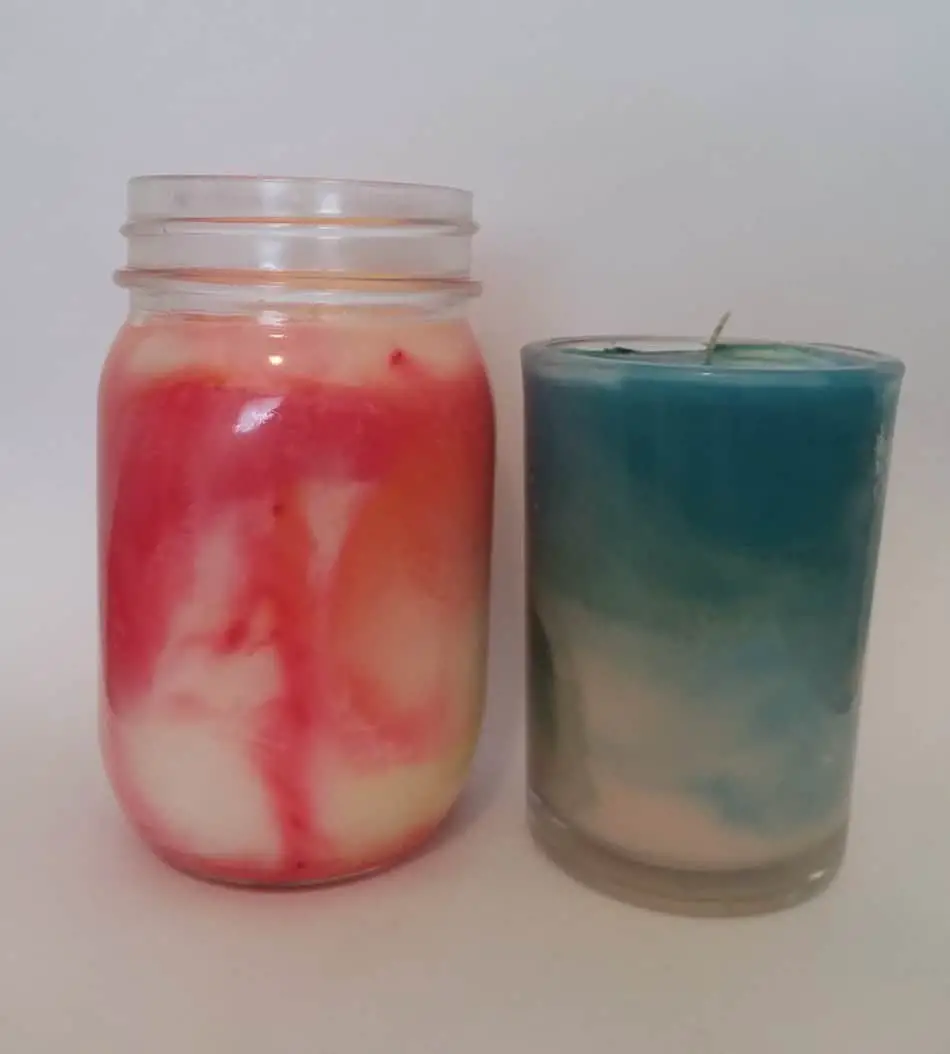
Marbled Glass Jar Candles
This project takes a boring, old glass jar candle and turns it into something pretty and elegant.
SUPPLIES:
- Clear glass jar container candle, preferably white or a lighter color with a straight edge
- Metal rod or wire, such as an old coat hanger or BBQ skewer
- Candle dye – liquid or dye blocks
- Heating tool
- Knife or other cutting utensil, only if using dye blocks
- Optional: Aluminum foil, might need if using liquid dye
- Optional: Lazy Susan (small turntable), gloves, or oven mitt
Important NOTES before we start:
- You want to use a candle with a straight edge, and not a curved edge or Mason glass style jar, because it will be harder to get the metal rod up against the surface of the glass.
- If you are using dye blocks, you will need a knife or something sharp to chop off chunks or shave off pieces of the dye blocks for use.
- Another optional item is a Lazy Susan. This helps to turn the candle while heating it, without touching it, because it will get hot. Or I suppose you could just use gloves or an oven mitt to handle the hot glass jars if you don’t have a turntable.
- You will only need the aluminum foil if you make 6 holes and are using liquid dye. You will know what I mean in a minute here.
Okay, let’s get started!
DIRECTIONS:
1 – Poke holes into the wax
Take a metal rod and poke a hole in the candle wax right next to the glass all the way to the bottom.
You can poke multiple holes around the glass jar, but 4-6 holes around the edge is a good amount.
Any more than 6 holes and the dye is just going to run together and turn into one color rather than have a marbled effect.
In fact, it is not recommended that you make more than 6 holes if you are using liquid dye.
2 – Add dye into the holes
Add the candle dye into the holes.
If you are using liquid dye, only 1-2 drops with 4 holes.
If you have 6 holes, you will want to “dilute” the liquid dye or put a few drops on a piece of aluminum foil and dip the metal rod into the dye first before placing it in the candle hole.
With dye blocks, you will have to shave a few pieces off and put a few chunks into the holes.
Use the metal rod to push the dye deeper into the candle.
Keep in mind the dye blocks won’t spread as much as the liquid.
3 – Heat the candle
Heat the candle with the heating tool.
You want to focus on heating the outside surface of the jar in the area where the dye is located.
Stop short of where you want the color to be, because the dye will continue to spread after you remove the heat. So, if you don’t want the color to go too far, ease off early.
4 – Allow to cool
This is where patience comes into play. If you are watching the colors spread, you might be tempted to touch up the candle before it is completely cool.
Allow it to cool completely, before adding more heat.
If you want to touch up the candle after it is solidified again, you can. Just be cautious and remember to back off prior to where you want the color to be, because it will continue to spread even after you remove the heat.
The dye will continue to spread and combine with the melted wax until it cools.
Be aware that there will probably be air bubbles that you won’t be able to completely eliminate, unless you do more color blending. However, be cautious of this, because if you do too much heating, trying to get rid of air bubbles, the colors are going to continue to blend and it will just turn into one color.
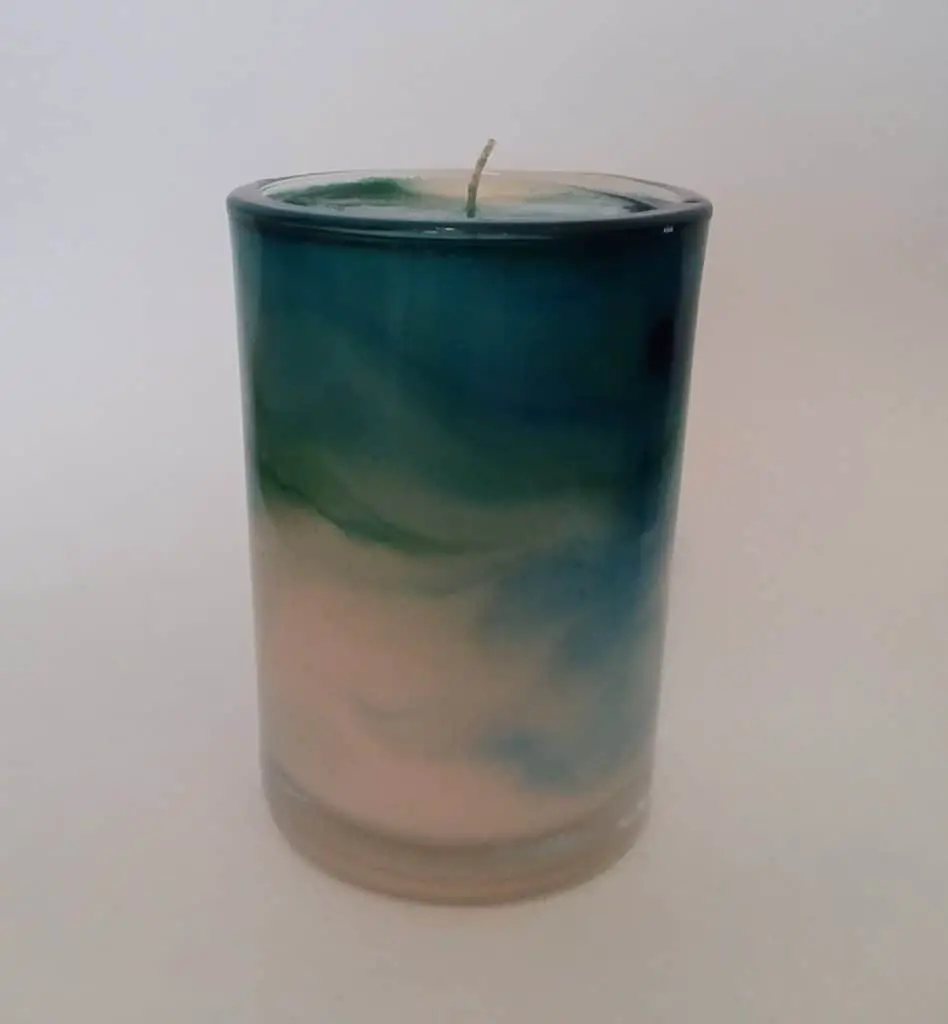
Tie-Dye Glass Jar Container Candles
This method uses the same idea, except this pertains to if you are making your own candle. You add wax with dye on the sides of the glass jar before you pour in the base wax (the uncolored wax). You have a little more control with this method, because you can lay out the colors in a way that you want them.
SUPPLIES:
- Usual ingredients for making a candle: candle wax, pouring pitcher, double boiler or Presto pot, scale, stirrer, thermometer, wick holder, etc.
- Glass jar for candle, candle wick, hot glue or wick sticker
- Candle dye
- Fragrance
- Syringe or spoon
- 1-3 small containers for the different colored dyes
- 3 large containers for the hot baths, or a heating tool
DIRECTIONS
1 – Melt your wax
Start melting your wax as usual, in which ever method you prefer: double boiler or Presto pot. If you’ve never made your own candle before, I can go over the steps for you. If you are familiar with how to make a candle, you can skip to the next step.
Heat a pot of water.
I would recommend using a double boiler method, if you aren’t too familiar with the candle-making process. You start by putting a pot of water on the stove and heat it up. You will then add the pouring pitcher of wax once you’ve measured it out.
Weigh out your wax.
You will probably need about ½ pound of wax for a 16 oz. container. It would probably be easiest to put the empty pouring pitcher on the scale first and then “zero it out” by pressing the TERO button.
Add wax to pouring pitcher.
Add the 0.5 pounds of wax and put it in the pouring pitcher. You don’t have to wait for the water to boil, but it should be pretty hot, at least steaming.
Set pitcher in pot of water to create a double boiler.
Put the pitcher in the pot of boiling or hot water.
Glue wick to bottom of jar (Step 2).
While waiting for the wax to melt, prepare the candle jar by gluing the wick to the bottom (see Step 2). You can use hot glue to do this or there are wick stickers that you can stick to the bottom.
Check temperature of wax and stir.
Make sure you are checking on the wax and stirring occasionally to help it melt. Put a thermometer in the pouring pitcher to keep an eye on the temp. It will probably get to about 180 °F.
Remove wax from heat once melted.
Once the wax is melted, turn off the heat and remove the wax to cool.
While the wax is cooling, you will get the different container colors ready (see Step 3). Keep an eye on the temp. Once the wax gets to about 175 °F or less, you will pour the wax into different containers for different colored dyes (see Step 4).
2 – Glue your wick
Prepare the candle jar by gluing the wick to the bottom. Or you can use a wick sticker.
3 – Get containers ready for different colors
After the wax has melted, turn off the heat to allow the wax to cool while you get the different container colors ready.
Take your 1-3 small containers for the different colored dyes and set them out for the wax and dye.
4 – Add dye to the small containers
Once the wax has cooled to the appropriate temperature for adding dye (175 °F or less), take your 1-3 small containers to use for the different colors and put a small amount of wax into each container.
Add a different color dye to each small container and stir to mix thoroughly. For ½ pound of wax, you will only need about ½ of a diamond chip.
5 – Add dyed wax to the sides of glass jar
Using a syringe or spoon, spread the dyed wax on the sides of the glass jar.
Let the sides cool and harden before you pour in the base wax.
6 – Add fragrance to the base wax (optional)
Don’t forget to add any fragrance you want in your base wax at the appropriate temperature.
7 – Pour in base wax to the glass jar
Let the sides cool and harden before you pour in the base wax.
You don’t really need to add any color to the base wax. If you do decide to add any color to the base wax, keep it a neutral color. You don’t want it to clash too much with the tie-dye colors you are using.
The base wax should be fairly cool, almost chunky, about 120 °F or less, when you pour it.
Let the candle set for a little bit. You can use either 3 hot baths or a heating tool for spreading the color. The 3 hot baths should be at varying temperatures: warm, hot, and boiling.
8 – Heat the sides of the jar to spread color
After the candle has sat for a few moments, you will heat the sides of the jar to spread the color.
You can put the candle jar in a hot bath using 3 stages of water (warm, hot, and boiling), which will help the dyed wax heat up again and spread. Start with the warm water first, then move to hot, and then boiling. You don’t want to shock the glass by adding it the boiling water right away. And be careful with the water; it can BURN!
As you take out the candle from the heat bath, you can spin the jar, which will create a swirled effect.
If you don’t want to use the 3-stage heat bath approach, you can use a heating tool here to help spread the color.
You will have to be patient during this process, as well.
Remember, that the color will continue to spread until the wax is completely cool. So, even if you think the color hasn’t spread far enough, let it set until it is completely cool.
If you still want to spread the color some more after the candle has solidified, you can use a heating tool to direct your heat to a certain area.
Tie-Dye Pillar Candles
This method involves taking a regular white pillar candle and dunking it in water that has been colored with dye. When the candle comes out, it has a tie-dye effect!
SUPPLIES:
- Water
- Pouring pitcher (or a simple, old pot would work – not to be re-used for food!)
- Heat plate or stovetop
- Thermometer
- Dye blocks – solid form, chunks
- Pillar candle with a long wick
- Optional: Rubber or latex gloves
Important NOTES before we start:
- You could use a pot for the water, but since you are adding the dye to this, you might as well use the candle-making equipment that is made for this and is already stained.
- You must use solid dye blocks. Liquid dye will not work for this project.
- Side note: I learned a cool trick of how to make your own dye blocks from liquid dye. Take some old plain wax, add the color you want, pour into an ice tray to solidify (don’t need to put in freezer but I suppose you could if you wanted to speed up the process), and you have made your own DIY dye blocks!
- Again, anything you use for candle-making equipment should NEVER be re-used for food. So, if you decide to do this, you have now added a piece of equipment to your candle-making collection with a new ice tray.
- Make sure your pillar candle has a long wick to hold onto while you are dipping your candle. Also, a white or lighter color would be best, so you can show off the tie-dye colors/design you will be making.
- Rubber gloves are an optional item. You might be getting your fingertips dirty when dunking the candle. If your fingers get submerged, they will be stained with dye for a bit. If you don’t mind this, you can forego the gloves, but if you don’t want to have colored fingertips, you might want to opt for some gloves when dunking your candle.
DIRECTIONS:
1 – Heat water to 150 °F.
Fill the pouring pitcher with water and put on heat plate. Use enough water, so that the candle will be submerged when dunked in the water. So, measure the height of the candle and fill up the water to that same level.
Heat the water to 150 °F. You don’t want the water to boil, so keep an eye on the temp.
2 – Cut dye blocks into chunks.
If you don’t want to get your fingers dirty, you can put on some gloves.
Cut dye blocks into tiny pieces to add to the water.
3 – Add dye to the water.
Once ready, add the dye blocks to the water.
4 – Gently stir the water to create effects.
After they melt, you can give the water a light, gentle stir. You should see blobs of color floating in the water. We are not looking to mix it together.
5 – Dip the candle.
Then, dip the candle. Grab the candle by the wick and dip it into the water. Don’t go too fast or too slow.
You can give the candle a swirled effect by spinning the candle before you dip it and you will notice how the design is slightly different than when you are just dipping the candle regularly without spinning it.
Then, bring it out, let it drip dry for a few seconds, and set it on an even surface to dry.
Glass Jar Candles with Marbled Effect (Creamy Appearance)
This last method is one you can use if you are making your own candles and want to give them a unique look!
SUPPLIES:
- Usual ingredients for making a candle: candle wax, pouring pitcher, double boiler or Presto pot, stirrer, thermometer, wick holder, etc.
- Glass jar for candle, candle wick, hot glue or wick sticker
- Candle dye
- Fragrance
- Syringe or spoon
- Separate container(s) for different colored dye(s)
- Stirrer, such as a toothpick or metal rod
DIRECTIONS:
1 – Prepare your wax
Melt your wax, adding your fragrance at the appropriate temperature.
Since this will be our base wax, don’t put any dye in. If you do want to add color, use a neutral color, so it won’t clash with your marbled colors.
2 – Prepare your jar
Prepare your jar, as usual, gluing the wick to the bottom.
3 – Pour the undyed wax into the jar
Fill the jar with wax normally like you would be making a regular candle, at the appropriate temperature.
4 – Prepare separate containers with dye
Prepare a separate container of melted wax with a colored dye you want for the marbled effect.
5 – Add the colored wax to the candle jar
Then, fill a syringe or spoon with the marble color and drop it in or on top of the wax before it sets. Adding only 1-2 drops, take a stick and stir or swirl the wax a little to get a marbled effect.
This technique creates more of a creamy effect, because the colors are combining a little more thoroughly and running into each other. The colors almost look like they blend together. This technique produces not as distinct of a difference between the colors as the previous method and has no distinct lines between colors.
I hope you enjoyed these tie-dye and marbled DIY candle-making ideas!
This is Part 2 of a 5-Part DIY Candle Series. I have written 5 blog post articles, each covering a different DIY candle idea. If you enjoyed these candle ideas, please check out these other DIY candle ideas:
- Decorating pillar candles with tissue paper
- Tie-Dye or Marbled Candles
- Water Candles
- Jewelry and Hidden Gift Candles
- Galaxy Candles
