

I saw a picture of these candles and thought they were so cool-looking. They look so elegant.
You can get so creative with this technique and build your own unique, under-water world!
How do you make a water candle? One way is to add oil on top of water in a glass jar, with a wick taped in the center of a piece of plastic. Another method is to make floating candles with paraffin wax, a tart mold, and a wick to place in a vase with water. You can add decorative items and/or food coloring. A third method is to dunk a candle in an ice bath as you are pouring wax on it to create unique shapes.
I am going to be discussing all three of these methods to make “water” candles. The first method is a floating flame candle using just oil and water with no wax. The second method is a floating wax candle on top of water. The third method is a “gothic-style” candle to make weird-looking extensions and designs.
These floating water candles are great for building extraordinary room décor ambience and a unique addition for special occasions, such as a centerpiece for a table at a wedding, birthday party, etc.
The gothic-style water candles look so magnificent, marvelous, and fun to make!
This is Part 3 of a 5-Part DIY Candle Series. I am posting 5 blog post articles this week, each covering a different DIY candle idea. If you enjoyed this unique project, please check out these other DIY candle ideas:
- Decorating pillar candles with tissue paper
- Tie-Dye or Marbled Candles
- Water Candles
- Jewelry and Hidden Gift Candles
- Galaxy Candles
Floating Flame Water Candle with Oil (No Wax Candle)
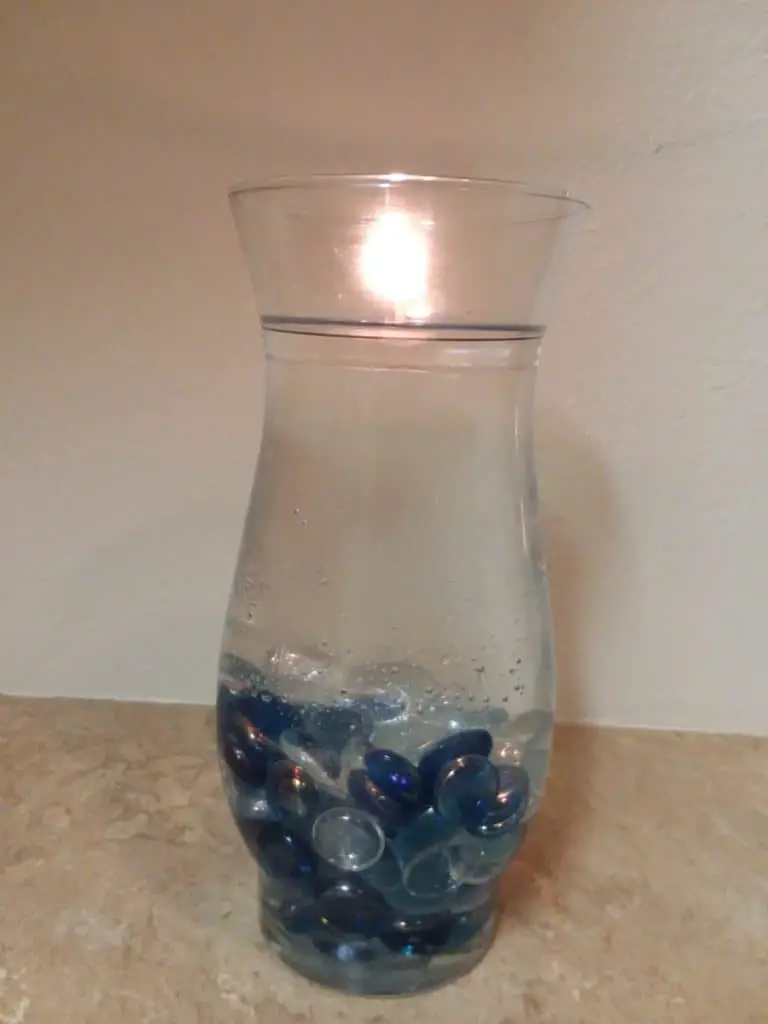
What is unique about this project is that it requires no wax! It essentially looks like a flame floating on water.
So, how do you make a candle from water and no wax? You use oil instead of wax as the fuel source.
Since oil and water don’t mix, if you add water to the jar first, the oil will sit on top of the water.
So, you have two distinct layers and the water will not reach the flame to extinguish it.
Now, once the flame has used up the oil as its fuel source, the candle will burn out.
How does this work? Since we are using oil as the fuel source, instead of wax, the wick will absorb the oil, which will feed the flame to keep it alive.
The wick serves as the “channel” for the fuel source, whatever that may be (oil in this case), to travel to fuel the flame. The wick material needs to allow the fuel (oil) to travel upward through a “capillary action” channel mechanism.
For more information, please see my “Intro to Wicks” article about how wicks work.
Here is the recipe for how to make a water candle with no wax and oil:
SUPPLIES:
- Glass jar
- Water
- Lamp oil or vegetable oil
- Thin, plastic sheet
- Scissors or X-Acto knife
- Candle wick
- Tape
- Optional: Food coloring, colored beads, crystals, artificial flowers, pebbles, rocks, marbles, sand, other decorative items, etc.
- Optional: Essential oil for fragrance
NOTES before we start:
- The choice of glass jars is important. You want to make sure it can withstand the heat.
- You don’t need a wick with a base, or metal-bottom. We are going to be taping the wick to a piece of plastic, which will sit on top of the water.
- Cotton wicks are good choices. However, don’t use cotton wicks and vegetable oil. If you are going to use cotton wicks, use lamp oil. Vice versa, if you only have vegetable oil, find an alternative to using a cotton wick. If you would like more information about wick choice, here is a link to an article I wrote. {LINK}
- You can use recycled wick trimmings from previous candles you have made or trimmed. You don’t need a very long wick for this, just a couple inches will do. Therefore, this would be a good way to use those old wick trimmings you have cut off from previous wax candles you have made!
- Don’t fill the glass too high with water and oil. You want the flame of the wick to be at the same level or below the top of the glass jar, to prevent drafting. Whenever a flame flickers, it can smoke and create soot.
- And you don’t need to add a lot of oil to the top. A little will do the trick!
DIRECTIONS:
- Find an appropriate glass jar container for candle-making. It could be any shape, either circular or square.
- Fill the glass jar with water. You can add food coloring, marbles, fake flowers, or other decorative items to the water if you want. Get as creative and decorative as you want! However, you want to avoid over-crowding the jar. Make it look cool, but not too over-done.
- Then, add some oil on top of the water. This will be the fuel for the flame, since we are not using wax here. So, the more oil you add, the longer the candle will burn. However, you don’t want to add too much oil.
- Optional: You can add a few drops of essential oil for fragrance.
- Take a plastic sheet and cut out a circle or square, depending on the shape of your jar, a little smaller than the glass. It doesn’t have to be a perfect.
- Cut an X in the approximate center of the plastic circle or square.
- Take your wick and thread it through the plastic. Tape to the bottom of the round plastic piece.
- Place the wick on top of the oil. Let the wick absorb the oil. (Side note: The wick needs to absorb enough of the fuel, in this case oil instead of wax, to funnel or channel it to the flame. The flame will not stay lit if it does not have a continuous supply of fuel.) link to article?
- Light the candle and enjoy!
This strategy would be good for survival or “emergency” type situations, such as power outages or when you are camping.
NOTE of CAUTION: This candle should not be moved once you light it. So, make sure you have it set and arranged the way you want it prior to lighting it.
DIY Make Your Own Floating Candles!
This second method includes making your own small, floating candles you can place into a vase with water.
What is a floating candle? A floating candle is a small tart-like candle that is buoyant, so that it can float on top of water. It needs to have a wide base and not be tall or “top-heavy.” They are usually no more than 2-3 inches wide and an inch tall.
It’s kind of like a large tealight without the tin container. Or a flat, squished votive.
Which wax should you use for making your own DIY floating candle? Paraffin wax. You need to use a pillar wax, which is used for free-standing candles that need to keep their shape/form when lit.
Can you use soy wax? Soy wax is best used for container candles, tealights, and votives. Soy wax is not intended for free-standing candles, such as pillars and tapers.
If you want to use soy, it will have to be a soy-blend. For examples a paraffin-soy blend would work for a pillar candle.
Beeswax and palm wax are also approved for free-standing candles, such as pillars. If you want more information about how to choose a wax, check out my blog post article here.
Here is the recipe for making candles that float on water:
SUPPLIES:
- Vase for presentation
- Water
- Paraffin wax
- Regular equipment for making a candle: pouring pitcher, double boiler or Presto pot, stirrer, thermometer, wick holder, etc.
- Wick
- Essential oil or candle fragrance
- Dye block or chips
- Small tart candle mold
- Play-Doh or putty
- Optional: Petroleum jelly (Vasoline) or cooking spray to coat the mold
- Optional: glitter, food coloring, colored beads, crystals, artificial flowers, pebbles, rocks, marbles, sand, seashells, other decorative items, etc.
DIRECTIONS:
1 – Prepare the Wax
Prepare your wax, as usual. Melt your wax and add the dye and fragrance at the appropriate temperatures. If you don’t know how to do this, I will go into more detail.
If this is your first time making a candle, I will go over each step. If you are familiar with making a candle, you can skip to Step 2.
Prepare a double boiler by heating a pot of water.
If you’ve never made a candle before, I would recommend using a double boiler method. You start by putting a pot of water on the stove and heating it until it boils. You will then add the pouring pitcher of wax after the water is boiling. As you’re waiting for the water to boil you can get your wax ready.
Weigh out your wax.
Weight out the wax and add it to the pouring pitcher. You don’t need to use too much, because you are making small candles, unless you want to make a bunch of them.
About ½ pound of wax should be sufficient for this project.
Add wax to pitcher and put in water to create a double-boiler.
Add the wax to the pouring pitcher and put the pitcher in the pot of boiling or hot water.
Wait for the wax to melt.
Keep a thermometer in the pouring pitcher to keep an eye on the temp. It will get to about 180 °F.
Stir as the wax is melting to speed up the process. Turn off the heat as soon as all the wax is melted.
Once the wax is melted, add dye and fragrance.
Let it cool and you will add colored dye at about 175 °F and fragrance at 130 °F.
2 – Prepare Your Candle Molds
- Optional: You can coat the candle mold with either Vasoline or a cooking spray, so the candle will be easier to remove.
- Optional: You can add glitter to the candle mold if you would like. This adds a beautiful, decorative touch to your candles.
3 – Add the Wick
- If you have a hole on the bottom of the tray mold for the wick to pass through, you are going to want to plug that with Play-Doh or putty around the wick. Make sure the candle mold is able to sit evenly, so you don’t end up with a crooked candle.
- If you don’t have this type of mold, you can actually use a metal-bottomed wick (with no wick or sticker because you want it to be released from the mold), if the top of your candle is going to be flat and doesn’t have a decorative design or surface.
4 – Pour Wax Into Molds
- Pour the wax into the tray molds.
- You might need some type of wick holder to center the wick and keep it from drooping.
5 – Allow to Cool and Then Remove
- Allow to harden and then remove gently.
- Trim the wick.
6 – Fill Vase with Decorative Items and Water
- Using a vase, fill with decorative items.
- Add water and optional food coloring.
7 – Add Floating Candle
- Place the floating candle on top of the water and light.
- Enjoy!
Tips: If using cotton wicks, be careful of getting the wick wet, because cotton absorbs water. Hold onto the wick as you gently place it into the water, so that it does not become submerged or the wick does not get wet.
If you don’t want to make your own floating candles, you can buy them. Here are some floating candles I bought from Amazon.
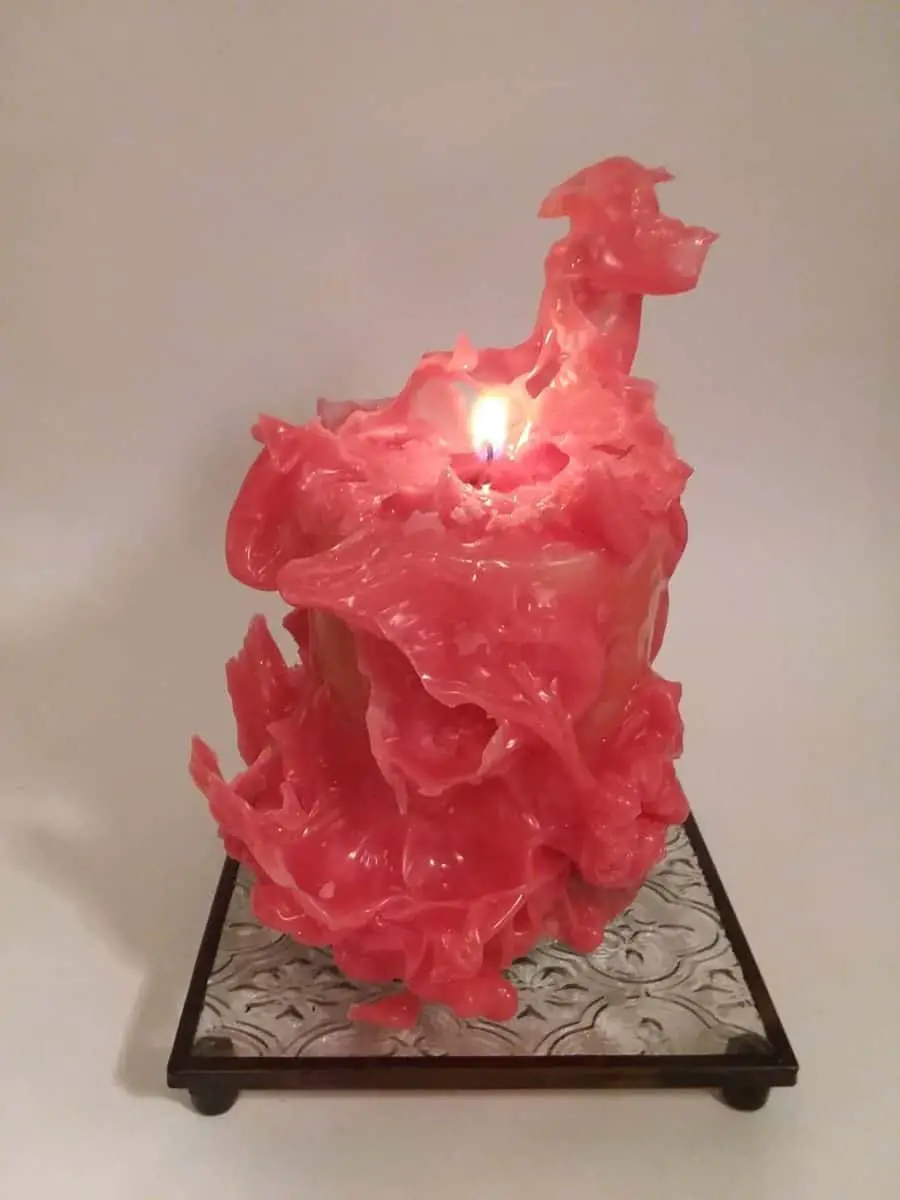
Gothic Candles
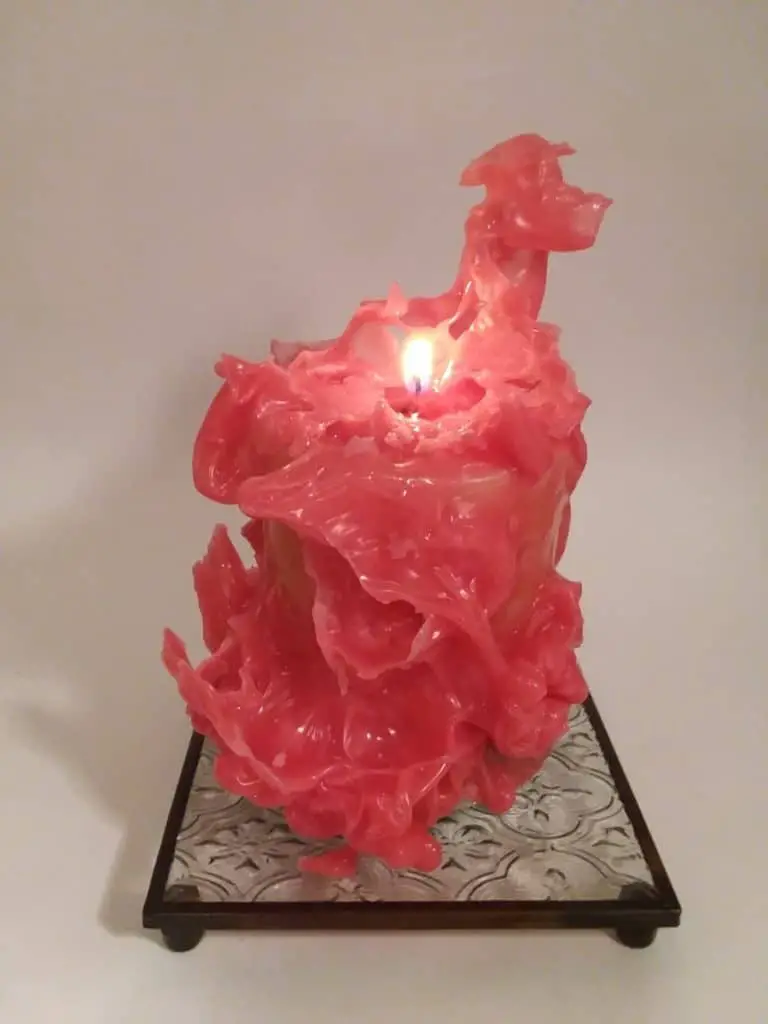
I found this video on YouTube about how to make these “gothic-style” candles, using wax and cold water. It is not a “floating-type” candle that I have been discussing, but it is a candle you can make with water, so I thought it was pretty cool and something to include in this post.
SUPPLIES:
- Metal lid from a jar
- Optional: Super glue or hot glue, if using a Mason jar lid
- Usual supplies to make a candle: pillar candle wax, pouring pitcher, double boiler or Presto pot, stirrer, thermometer, etc.
- Separate containers for the colored waxes
- Candle dye
- Pillar candle or taper
- Large container and water for ice bath
- Gloves
NOTES before we start:
- You can use any type of metal lid, such as from a pickle jar or a Mason jar. If you are using a Mason jar lid, you will have to glue the lid to the rim since they usually come in two separate pieces. You can do this using super glue or hot glue. Make sure both sides are completely closed and covered in glue. You want it to be “water-proof” in a sense, because you don’t want water getting through from one side of the lid to the other.
- You are going to be using different colored waxes and adding it to the base candle to make different shapes by dunking the candle in an ice bath. It will take on different forms as you submerge the candle and twist or turn the candle under water. Make sure the container for your ice bath is deep enough to submerge your candle, plus at least a few inches.
DIRECTIONS:
1 – Melt the Wax
Melt the wax, like usual, in whatever method you prefer: Presto pot or double-boiler. Make sure you are using a pillar wax, such as paraffin, or a wax blend made for stand-alone candles.
2 – Get a Metal Lid for Candle
Optional: If you are using a Mason jar lid, make sure to glue it together with super glue or hot glue.
3 – Fasten the Pillar Candle to the Lid
You are going to fasten the pillar or taper candle to the metal lid using wax.
Place the lid with the rim up, so the top of the lid is face-down.
Then, pour some wax in the center of the lid.
Set the candle down and pour wax around the base of the candle to set it in place.
Allow to harden so the base candle does not move.
4 – Prepare an Ice Bath
Prepare an ice bath in a large container. You are going to be dipping the candle on the lid, so make sure the container is deep enough to submerge the candle.
5 – Add Dye to the Wax
You might want to put gloves on during this step. Take a container of wax and add a dye color.
6 – Pour the Colored Wax on the Lid Candle While Dunking in Ice Water
You are going to pour the colored wax on the lid candle as it is on top of the ice bath.
Slowly bring the candle underneath the water as you pour the wax on the candle.
As you do this, the wax will start to harden and form different shapes.
You are basically shocking the hot wax into becoming a solid quicker.
You can make some pretty strange-looking candles with this technique!
7 – You Can Use Different Colored Waxes
Change colors as you wish.
You will probably have to reheat the wax in the containers as it starts to cool and harden before you can pour it.
Bits of wax will probably break off your pillar candle. They will float on top of the water, so you can just pick them out and put them back in the pouring pitcher to be melted.
For Decoration or to Burn?
Most people simply save these as decorative pieces to display, but as long as you don’t bury the wick and leave the wick exposed, they can be burned. If you do accidentally bury your wick, you can dig it out with a toothpick, knife, or BBQ skewer (while the wax is still pliable).
If you do decide to burn the candle, just make sure to set it on an appropriate surface. You may need to set it on a plate or tray, in case the wax falls off the lid as it melts.
This was a really fun and cool project! This is one you can’t really get wrong. You can make all sorts of crazy shapes. And it is a quick project; it doesn’t take long at all!
I hope you enjoyed these 3 DIY “water” candle project ideas!
This is Part 3 of a 5-Part DIY Candle Series. I have written 5 blog post articles, each covering a different DIY candle idea. If you enjoyed these candle ideas, please check out these other DIY candle ideas:
- Decorating pillar candles with tissue paper
- Tie-Dye or Marbled Candles
- Water Candles
- Jewelry and “Secret Messages” Candles
- Galaxy Candles
Recent Posts
An In-Depth Beginner Basics Manual on Candle Wicks: Wick Names and Numbers
Wick testing has to be the most frustrating part of candle-making for me. While I’ve been learning about the different types of wicks and which wick goes best with which wax, I noticed that...
A Complete Intro Lesson to Candle Wax Basics: How to Decipher the Code
After finishing my first candle-making kit and watching YouTube videos, I decided I wanted to try making more candles. I needed to order more wax, but quickly realized the options were...
